Degdrôn is a 10-oscillator drone synth (deg drôn means “ten drones” in Welsh). The synth has been designed for a very specific sound and has an architecture set up to achieve it.
The ten oscillators are grouped together into five banks of two, with each bank having its own AHDSR envelope, panning control, saturation control, reverb and delay sends and pitch and gate modulation. These five banks are all passed through a filter, bitrate-reducer and eight-mode custom waveshaper module known as the Mutilator.

We designed Degdrôn specifically for drones, but it can be equally used for pads, leads, bass, percussion or any other type of sound. Above all, sound design with Degdrôn is enormous fun. It is a “knob-per-function” style synth, making the process fast and easy. The real fun, though, comes from the unpredictability of the interplay between the ten oscillators. As an experiment, solo a few of the individual oscillators in some of the presets, and you will often hear that they sound markedly different than when combined with the other nine oscillators.
Although this Quick Start Guide explains how to use the controls within Degdrôn, the real fun begins when you start experimenting with it. If you have any questions, feedback or suggestions, please don’t hesitate to reach out via the contact page.
The Main Interface
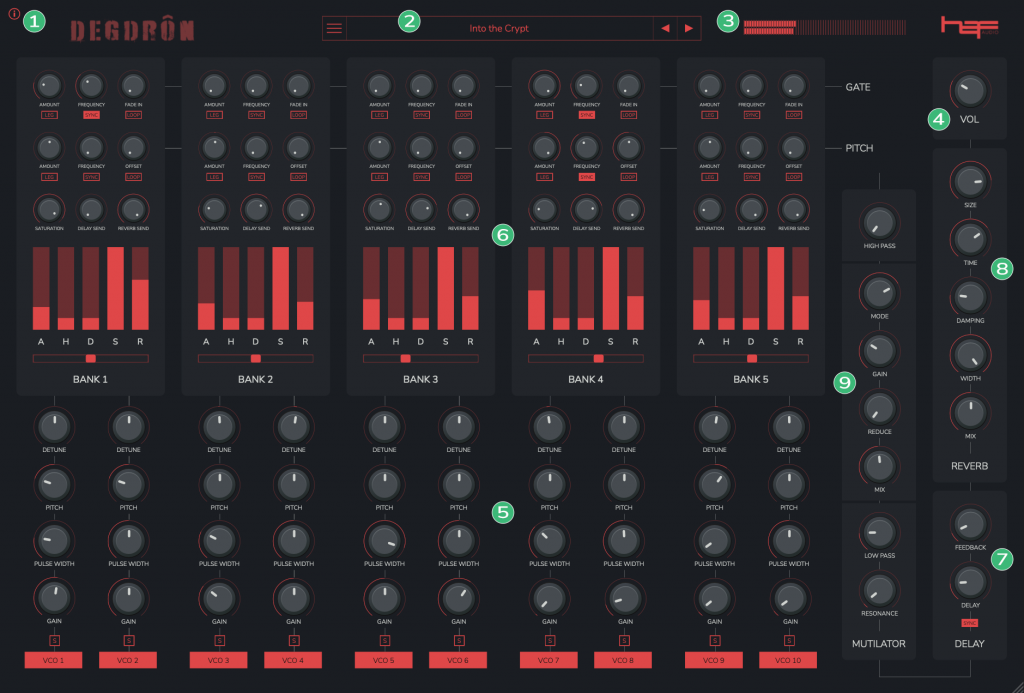
Degdrôn’s controls can be located in the following 9 areas of the user interface:
- Settings Panel
- Preset Browser
- VU Meter
- Main Volume
- Oscillator Controls
- Bank Controls
- Delay Controls
- Reverb Controls
- The Mutilator
1. The Settings Panel

Clicking the ![]() icon in the top left corner of Degdrôn will open the Settings Panel.
icon in the top left corner of Degdrôn will open the Settings Panel.
The six buttons at the top left of the panel allow the user to set the zoom level to suit the monitor size being used.
The panel to the right of the Haf Audio logo is only displayed if running Degdrôn outside of a DAW or other plugin host. This panel allows users to select audio drivers, output devices, buffer size, and sample rate, set the global tempo in beats per minute (BPM), and select a MIDI source, such as a MIDI keyboard controller.
Press the ![]() button again or the close button on the top-right to return to the main synth screen.
button again or the close button on the top-right to return to the main synth screen.
2. The Preset Browser
The quickest way to get started with Degdrôn and learn the synthesiser itself is to browse the pre-installed presets and adjust them to create your own unique sounds.
The preset quick browse panel is displayed at the top of the main synth screen.

The quick browse panel displays the name of the current preset. The arrows to the right of the preset name will move you to the previous or next preset.
WARNING: When you change preset, you will lose any modifications to the current preset that you have not saved.
Click the preset name in the preset quick browse panel or the ![]() button to open the full preset browser.
button to open the full preset browser.
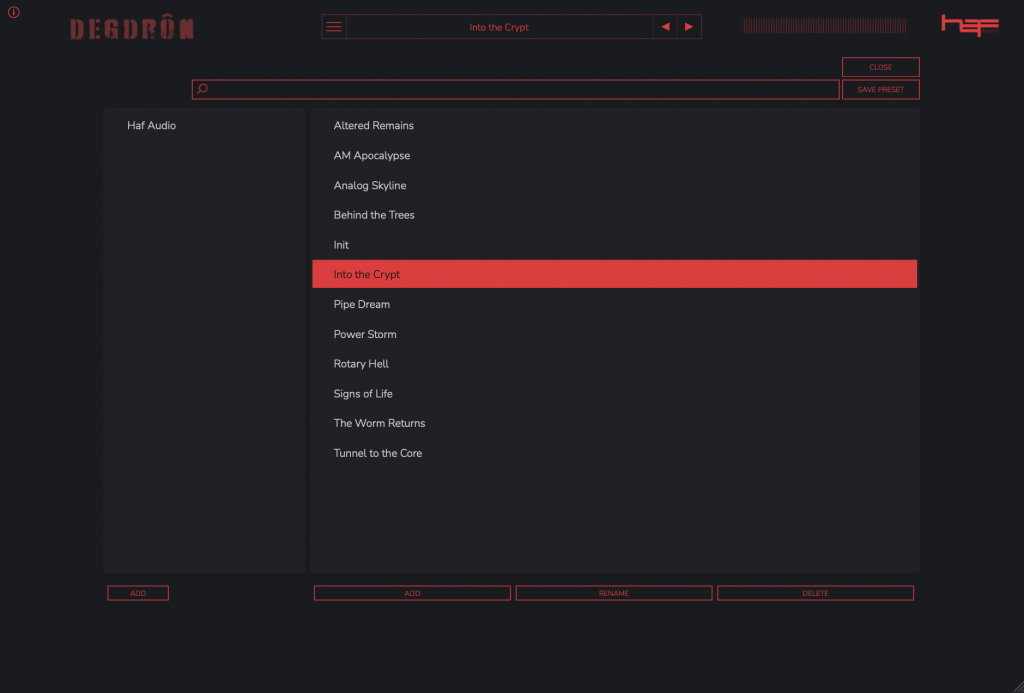
Presets are organised into banks and listed in alphabetical order. The search bar at the top of the preset browser allows you to search for presets by name.
Degdrôn comes installed with a selection of factory presets. These can be accessed by clicking the Haf Audio bank in the left-hand panel of the preset browser and then clicking on the preset name in the right-hand panel. The currently loaded preset is highlighted.
Creating Presets
To create your own preset bank, click the “Add” button under the left-hand panel and enter a name for your preset bank.

To add a new preset, select the bank you wish to add it to and click “Add” under the right-hand list of presets.
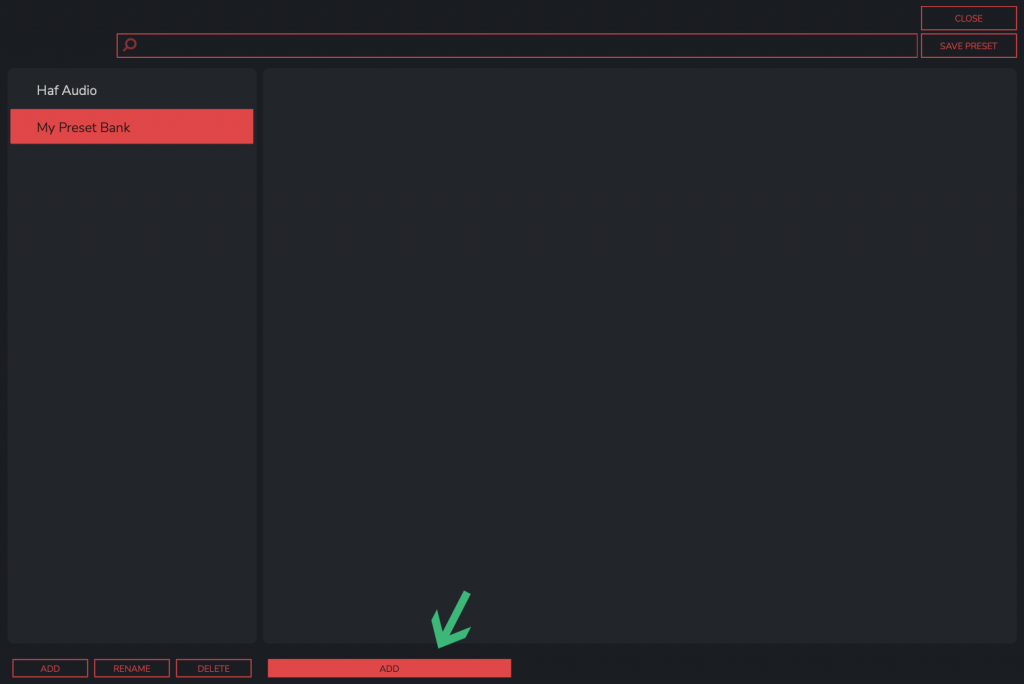
Enter the preset’s name and click “OK” to save it. The new preset will now appear in the browser.
Editing & Saving Presets
Presets and preset banks can be renamed and deleted using the buttons under the relevant section. To save changes to an existing preset, click the “Save Preset” button in the top-right of the preset browser.

A confirmation message will be shown when saving edits to an existing preset. Click “OK” to save the preset or “Cancel” to abort the save process.
NOTE: You cannot add, save, delete or rename presets in the Haf Audio preset bank which comes preinstalled with Degdrôn.
Press the close button on the top-right to return to the main synth screen.
3 & 4. VU Meter and Main Volume
Due to the nature of the synth and its ten oscillators, you may find the need to adjust the overall volume to prevent clipping. The main synth screen has a meter that allows you to view the overall output of both stereo channels. The left channel is shown on top, and the right stereo channel is displayed underneath.
Adjust the knob marked “Vol” to set the output volume to the desired level. Each of the ten oscillators also has its own Gain control to adjust at an individual level.
5. Oscillator Controls
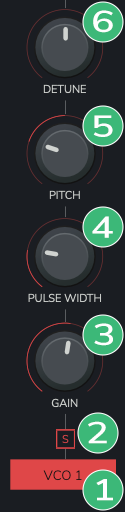
Each of Degdrôn’s ten oscillators has a set of six controls which affect its individual output:
- Enable / Disable – when lit, the oscillator is enabled and emits sound.
- Solo – temporarily disables all other oscillators. Working with ten oscillators can make it difficult to remember exactly what each of them is doing, so the solo button can be very helpful when you want to find a particular sound. However, part of the fun of Degdrôn, and how it can help you come up with incredible drone sounds, is the interaction between these oscillators when they are all combined, so the oscillator may sound quite different when soloed.
- Gain – controls the output gain of the oscillator.
- Pulse Width – each of Degdrôn’s ten oscillators emits a triangle wave with a modifiable pulse width. Adjusting this control will give a vastly different sound, from warm and rich to thin and raspy.
- Pitch – adjusts the pitch of the oscillator in semitones. Each oscillator can be pitched up to four octaves up and down from the played note.
- Detune – adjusts the oscillator’s pitch up and down in cents, up to one semitone in either direction. Detuning can create interesting harmonic and phasing effects between oscillators and help “thicken” a sound.
6. Bank Controls
Degdrôn’s ten oscillators are grouped into five banks of two. Each of these five banks has a number of controls which apply to the pair of oscillators within them.
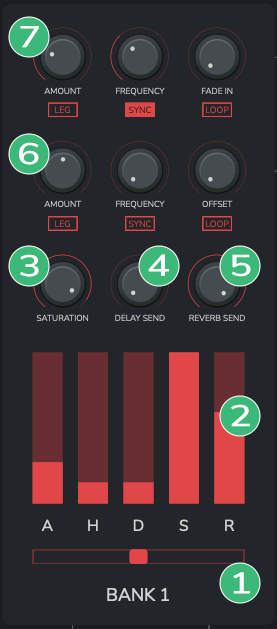
- Panning – pans the output of the bank within the stereo field.
- AHDSR Envelope – controls the Attack, Hold, Decay, Sustain and Release.
- Saturation – specifies the amount of saturation to add to the signal emitted by the bank’s oscillators.
- Delay Send – controls the amount of the bank’s signal to be sent to the delay module.
- Reverb Send – adjusts the amount of the bank’s signal to be sent to the reverb module.
- Pitch Modulation Controls – The three knobs control (from left to right) how much the pitch should be modulated (in cents), how quickly the pitch should be modulated and the offset of the sine wave modulating the oscillator frequency.
The three buttons underneath the knobs toggle (from left to right) legato mode, host tempo sync and loop mode. - Gate Modulation Controls – The three knobs control (from left to right) the amount of gate modulation to be applied to the bank (similar to a square-wave LFO), how quickly the gate should be modulated and the fade in time of gate modulator from note press.
The three buttons underneath the knobs toggle (from left to right) legato mode, host tempo sync and loop mode.
7. Delay Controls
Each oscillator bank sends all, part, or none of its signal to the delay module (see Bank Controls).
- Tempo Sync – when enabled, it syncs the frequency to the host tempo or global BPM.
- Delay – sets the frequency of the delay.
- Feedback determines the amount of delayed signal to be fed into the module and affects the number of repeats emitted by the delay effect.

8. Reverb Controls
Each oscillator bank sends all, part, or none of its signal to the reverb module (see Bank Controls). This algorithmic reverb module has a number of controls that allow you to create some interesting reverb effects for your drones.
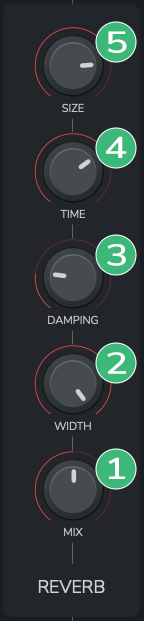
- Mix – the amount of reverb to be output in the final signal.
- Width – the width of the reverb in the stereo field.
- Damping – controls the absorption of high frequencies in the reverb.
- Time – the length of the reverb in seconds.
- Size – simulates a larger or smaller space for reverberation.
9. The Mutilator
In the signal chain between the bank controls delay and reverb effects lies a custom eight-mode waveshaper, bit-rate reducer and filter module known as The Mutilator. This module can be used to really distort and shape your sounds.
- High Pass – sets the frequency of the high pass filter applied before waveshaping & bit reduction.
- Mode – eight modes of distortion are available. Some subtle, some not!
- Gain – gain applied to the distortion wave shaper.
- Reduce – bit-reduction of the signal.
- Mix – the amount of mutilated signal to output with the original.
- Low Pass – the frequency at which the low pass filter should start to remove sounds. All sounds below this frequency will be allowed through the filter. This is applied after waveshaping & bit reduction.
- Resonance – the resonance, or Q value, of the low pass filter.

MIDI CC Assignment
All controls are assignable to MIDI CC values. This is done by right-clicking the control and choosing to either assign or learn a MIDI CC value. Multiple controls can be assigned to the same MIDI CC. Multiple controls can be assigned to the same MIDI CC value, creating useful performance options with multiple controls mapped to CC1 (Mod Wheel), for example.
To assign a MIDI CC value, simply choose from the list. To get Degdrôn to “learn” a MIDI CC, simply click “Learn MIDI CC” and move the MIDI control you wish to assign. To unassign a MIDI CC from a control, right-click the control and choose “Remove MIDI CC#…”